All Posts (11086)

Sort by

image001_img_w630.jpg

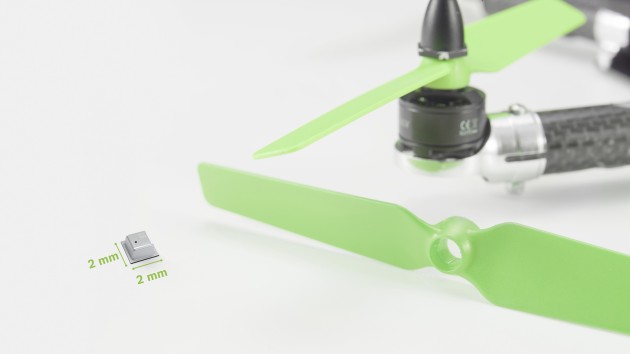
Bosch Sensortec is the market leader in barometric pressure sensors with more than 1 billion shipped products. The BMP380 is a very small, low-power and low-noise 24 bit absolute barometric pressure sensor. BMP380 is specifically designed and ideally suited for a wide range of altitude tracking applications. The new BMP380 offers outstanding design flexibility, providing a single package solution that can be easily integrated into a multitude of existing and upcoming devices such as smartphones, GPS modules, wearables and drones.

The sensor is more accurate than its predecessors, covering a wide measurement range from 300 hPa to 1250 hPa. This new barometric pressure sensor exhibits an attractive price-performance ratio coupled with low power consumption. It is available in a compact 10-pin 2.0 x 2.0 x 0.75 mm³ LGA package with metal lid.

Applications

- Altitude stabilization in drones

- Improved calorie expenditure measurement accuracy in wearables and mobile devices

- Unprecedented precision for outdoor/indoor navigation and localization applications

- Enhanced GPS accuracy outdoors

Read more…

MiniRaceWing - Fly Fast, Stay Low

A friend of mine and myself are avid FPV pilots. We have developed a fast, agile and easy to transport FPV plane with a twist: It is crash resistant and extremely fun to fly.

miniracewing_small.jpg?width=480Besides our initial use case people have come up with different ideas of how to use the MiniRaceWing and so I am kind of curious what you would use it for.

I would love to hear your feedback!

Here is how it works:

Your FPV and RC gear is inside a carbon fuselage. If you crash and the impact would rip the wings apart, they detach(!) without any damage. You can put everything back together in seconds and fly again :)

The crash release also makes the MiniRaceWing easy to transport. Detach both Wings and it fits into a backpack.

The Wings are designed for fast and agile flying. We don't need a thick airfoil and we don't need cutouts for the motor. The Airfoil of the MiniRaceWing is thin and efficient

We are about to manufacture the first MiniRaceWings.

If you are interested, take a look at our Kickstarter page for more information and flying/crashing videos.

MiniRaceWing Kickstarter

I'll be glad to answer any of your questions.

Kind Regards,

Markus

http://miniracewing.com

Read more…

3689709866?profile=originalHi, since my last blog entry I made some more changes on my design. 

Key features:

  • Video TX antenna is positioned at the end of the main body to improve signal strength during fast flights
  • GPS hollow in the top part is replaced by a Buzzer hollow (I'll not use GPS in the future for FPV racers), the hole in the front of the main body can be left open for better air vent around video TX
  • I added a mall 3mm diameter hole in the top part for transmitter RX antenna placement
  • 0 degree of motor bank and 25 degrees of camera angle
  • electronics are the same as before 

Here are the uploaded STL files for printing and DXF for antenna plate milling.
I hope you'll like it.

Regards
Adrian

PS.: as always, use my design on your own risk!!!
If you think my work useful and would like to support the prototype building, you can donate by paypal (nhadrian@gmail.com) or any of the components listed above are wellcome.

3689709596?profile=original

3689709941?profile=original

3689709971?profile=original

Read more…
Developer

ArduPilot on the CL84 TiltWing VTOL

ArduPilot now supports TiltWing VTOL aircraft! First test flights done earlier today in Canberra

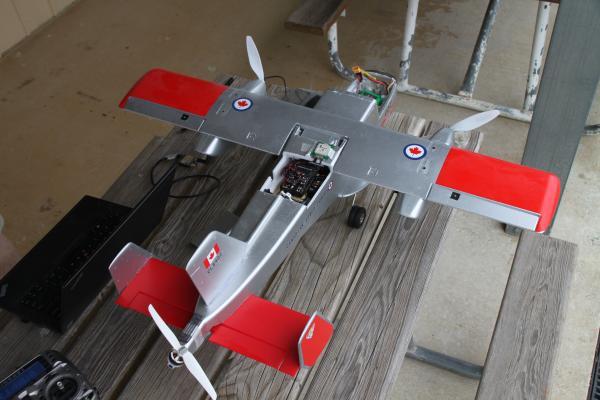
We did the first test flights of the Unique Models CL84 TiltWing VTOL with ArduPilot today. Support for tilt-wing aircraft is in the 3.7.1 stable release, with enhancements to support the tilt mechanism of the CL84 added for the upcoming 3.8.0 release.

ffa2797f6dfcb710af5607d86668b97607f6408f.JPG

This CL84 model operates as a tricopter in VTOL flight, and as a normal aileron/elevator plane in forward flight. The unusual thing from the point of view of ArduPilot is that the tilt mechanism uses a retract style servo, which means it can be commanded to be fully up or fully down, but you can't ask it to hold any angle in between. That makes for some interesting challenges in the VTOL transition code.

For the 3.8.0 release there is a new parameter Q_TILT_TYPE that controls whether the tilt mechanism for tiltrotors and tiltwings is a continuous servo or a binary (retract style) servo. In either case the Q_TILT_RATE parameter sets the rate at which the servo changes angle (in degrees/second).

This aircraft has been previously tested in hover by Greg Covey (see http://discuss.ardupilot.org/t/tiltrotor-support-for-plane/8805) but has not previously been tested with automatic transitions.
Many thanks to Grant, Peter, James and Jack from CanberraUAV for their assistance with testing the CL84 today and the videos and photos!

Read more…

Ranger EX 757-3


3689709807?profile=original

Update:  The local weather is improving and looks like tomorrow will be the maiden flight, really looking forward to its first flight.  The field I have selected is grass, and I have increased the main gear size to 4.5", which I hope will help with takeoff and landing.  With any luck, I'll have some video to post tomorrow.

  • Build complete
  • Weight and Balance Complete
  • Ground checks complete
  • Manual and FBWA ground checks complete

Configuration:

  • Motor: 3715 1000KV Outrunner Brushless Motor
  • Volantex 40A switch mode BEC Brushless ESC
  • Volantex Ranger EX 757-3 kit
  • Battery 11.1V 10200mAh LiPo 
  • 3DR Telemetry Transceiver
  • FRSky RC Receiver & FS-TH9X RC Transmitter
  • Aileron, Rudder, Throttle, Elevator, Flaps and mode control
  • Digital Airspeed Sensor
  • LIDARlite V3
Read more…

Initial Parameter Settings

3689709835?profile=original

For my maiden flight, takeoff and initial tests will be in the FBWA mode.  Followed by switching between FBWA and Manual to get the trim correct. 

Initial Parameter Settings:

Some basic gain/dampening factors for the first flight, except for power monitoring, compass/AHRS zero's and calibration the remaining parameters are left at the default value. 

  • RLL2SRV_P 0.80
  • RLL2SRV_I 0.00
  • RLL2SRV_D 0.02

  • PTCH2SRV_P 0.60
  • PTCH2SRV_I 0.00
  • PTCH2SRV_D 0.02

  • ARSPD_FBW_MAX 20
  • ARSPD_FBW_MIN 9
  • TRIM_AUTO 1

I'll update these, and post some plots of the roll/pitch control loops and power usage once

Read more…

Key features of Droiko

  • 3689709723?profile=originalReady to use gaming drone, just take it out of the box and start playing. No assembly no soldering required.
  • Laser + IR marker and proximity weapons.
  • Double coaxial propellers for higher stability and longer flight times.
  • Swashplate mechanism to allow for movements in every direction.
  • Fly it using your smartphone or any standard RC transmitter (using a bridge Checkpoint).
  • Fly it indoors or outdoors (if there is no wind).
  • High end sensors for higher stability, automatic altitude and easier flying.
  • Almost unbreakable, very easy and cheap to replace damaged parts in case of extreme crashes.
  • High performance, swappable battery for 12+ minutes of flight time with a single charge and unlimited gaming 3689709344?profile=originalchanging batteries.
  • Light weight (<50 grams) so it can be flown anywhere and does not need FAA registration.
  • Fully safe propellers for kids, pets and objects.
  • Checkpoints to define special areas in games.
  • Laser battles, drone racing and many other games.
  • Fully open source product, both hardware and software.
  • Learning platform for drone piloting, electronics and coding.
  • Customizable, hackable and expandable.
Read more…

We’re making drone mistakes everywhere. We’ve only had our grubby little paws on drones for a short amount of time and we’re already royally F-ing it up! Like a monkey being handed an Xbox, people are in awe of their flying eye in the sky. So much so, in fact, they forget to read the damn directions.

Look, this equipment is expensive. It’s important to read the manual and test your new robotic buddy in enough open space for him to roam. Emphatically whipping it out of the box and jamming the batteries in, isn’t exactly preparing for your first flight.

If you choose to do it the hard way—that’s fine, but take note of these drone mistakes, mishaps, and misfortunes that could have easily been avoided. Here are a few things that people are finding out the hard way, do NOT correspond well with drones.

Trees

Oak, maple, birch, Christmas trees…drones do not discriminate. This Christmas saw the quickest transformations from happy to sad the holiday has ever seen. That’s because as soon as people opened their drones, they somehow decided flying them indoors was a great idea. This should not have to be reiterated to adults, but flying a drone indoors is never, ever, ever a good idea. Landing them on the tops of trees isn’t either…


A story on how children are hard headed

Nephew got a drone for xmas. I told him not to fly it too high. Within ten mins of opening it it got stuck in a tree pic.twitter.com/zGrAKM6Pbf


Hair

We all know you love to mess with your friend’s hair, but landing your drone on their head is a horrendous idea. For some strange unexplained reason, people are not equating drone propellers with hair entanglement. Much like a rotating fan, moving drones are not something you want body parts (especially intertwining pieces) exposed to. Therefore, it’s best to fly the drone away from the top of your head, at all times.

Twitter @abbyhuff24

Twitter @abbyhuff24

Another Dimension?

Unbeknownst to some, you really do have to keep your eye on the drone when flying it. It will not return to you like a lost puppy. Many people who purchased drones over the holiday season, have also complained that they are flying into oblivion. In other words, they are getting lost left and right. How someone loses a large, heavy, flying robot, one can only guess.

hg

Considering how much can go wrong, maybe you need a professional after all to man the drone at your cousin’s wedding.  Avoid disaster and contact us today for a free quote. We’ll get you great shots and keep you in one piece.

Read more…

Fixed-wing UAV launch from car top

Hello everyone! 

For the past few months we were looking for a more convenient way to launch our PD-1 fixed-wing UAV (MTOW is 40 kg). Since runway takeoff and landing requires pretty serious and long training for the operator and any pneumatic launchers that will work with our UAV are expensive (from $30000 USD (actually we couldn't find anything less than $50k)) we decided to look for alternatives. Car top launch was one of those alternatives. We quickly developed a test unit and ran a few tests. So far we already have some statistics and pretty sure that it can be a good alternative to expensive pneumatic launchers in some civil applications with tight budget. Let me know your opinion on this. Do you think such way to launch a UAV could be an option? 

Read more…

3689709649?profile=originalThis video shows me flying our homebrew "Hackflight Sim" quadcopter flight simulator using a Spektrum DX8 receiver without a cable. The DX8 is talking to a Lemon RX satellite receiver connected to Teensy 3.2 (32-bit Arduino-compatible microcontroller), which connects to my Linux computer over a USB cable, as shown in the image below. A simple Arduino sketch reads the DSM-encoded values from the RX over the Teensy's RX1 (UART input) pin, and converts them to serial messages encoded using Multiwii Serial Protocol (MSP). The simulator parses these messages, converting them into stick demands to fly the simulated MAV.

Consistent with the Hackflight approach of using and re-using inexpensive, open-source hardware and software as much as possible, this hack relies on hardware (Teensy 3.2 micrcontroller, Lemon RX satellite receiver) and software (MSP parser) that we are using onboard our MAVs as well.

3689709697?profile=original

Although it'd be great to get this cable-free hack working with a commercial flight simulator like Phoenix, there is already at least one such solution available commercially.  

Read more…

Mapping solution with low cost fixed wing airframe

3689709664?profile=original

Hello,

I offer for sale a low cost solution to do mapping with different camera that can be easily placed in the airframe thanks to the battery front cover. The other advantages are easy connections between the airframe and the wings or the elevator for quick and safe assembly / disassembly.
I hope that my solution will catch your attention and allow you to make flights easily.

For information and buy  3689709611?profile=original    http://www.uav40.com  

Read more…
3D Robotics

Hack/Race DIY Robocars this weekend in Oakland

3689709577?profile=original

Join us for our first hack/race day at the new Oakland warehouse location for DIY Robocar events.

There are three tracks:

1) A RGB lane track, modeled after the FormulaPi track:

600_457592682.jpeg

2) A white-line track for 1/10th scale cars, which is designed to model lanes on real roads. The ones below are just temporary markings; the final lines will be wider and properly stuck to the surface.

600_457592684.jpeg

3) A walled-in course created by the PowerRacers group for PowerWheels-type racers, especially those using LIDAR to navigate 

600_457592691.jpeg

Rules:

For RGB track:

• 10m wide track, with red and green lanes.

• Blue lane dividers in FormulaPi course may be replaced by blank gaps showing concrete instead.  

• If this creates a problem for the cars, we will replace the blue tape

• Course is pretty smooth and most bumps are taped over. 1/2″ clearance under cars should be sufficient

For White-Tape track:

• 1.5 meter (5 foot) wide course with borders in 70-110mm (3-4 inch) wide white tape.

• yellow tape at the centerline 35mm – 55mm (1.5-2 inch) wide

• The course must have at least one left turn, right turn, hairpin turn(1.5m outside radius) and gradual turn ( >3m outside radius)

• Course should fit in a box 20m x 15mUp to 3 cars at a time (for now)

• Course may not be smooth so the car should be able to handle step shaped bumps of up to 25mm (1 inch)

• People will stand 3 meters away from the track.

Other stuff that will be provided: Tables, chairs, power, wifi, coffee, pizza. And interesting fun.

Don't worry if you don't have anything to bring/hack on. You're welcome to just hang out and do the meetup thing. Or help others hack their things. This is that brief moment where we can all be n00bs. Someday our cars are supposed to be perfectly safe and autonomous. But for now, let's hack and crash while we still can. 

Looking forward to seeing you all there!

Read more…

Droiko checkpoint smart mesh

3689709636?profile=original

Link to our Droiko on Kickstarter: Kickstarter Droiko

The Droiko checkpoint smart mesh is one of the most innovative aspects of Droiko . Each Droiko checkpoint is a very small plastic box containing some electronics, sensors and a small battery. Each Droiko checkpoint is fully independent and is an extra accessory. It takes drone gaming to the next level, but it is not actually needed to fly Droiko.

Its main use is to define a racing track, using them as radio-frequency references, but they are also used to define special areas or objectives in games and drone combats. They as well enable you to use any RC radio transmitter as the controller to fly Droiko. Just connect your RC receiver to its connection header and you are ready to go, no need for extra batteries or power. It is a very flexible accessory with many extra uses: laser target, height reference to improve automatic height control, or position reference to enable autonomous flight.


Each Droiko checkpoint is even a full development platform on its own. It is fully Open Source and documented, like everything related to Droiko. Features the same powerful Bluetooth enabled nRF52 processor as Droiko helicopter. It also features a programming USB port, multiple free I/O pins, a high power full color led, a 5V output and a high precision barometer. This is our way at Cactus Robotics to engage the community in creating innovative custom addons for Droiko. We encourage using our affordable, highly optimized and well documented electronics in any other project you like.  Each Droiko checkpoint is very easy to use, just switch it on and it will start working with its latest configuration. If you want to set it up, simply connect to it with your smartphone using our Droiko App and Bluetooth. This way you will be able to select its working mode (checkpoint, laser target, RC radio transmitter bridge, a combination of modes…), change its number/color or its field range. If you want to recharge the battery, open the enclosure and replace the battery for a fully charged one. Every Droiko battery is identical (helicopters and checkpoints) and you can charge them all with a single charger.


Once the checkpoints are set up (they come pre-configured) you can forget about them. No need to configure them every time, not even when you change gaming mode. This is possible thanks to its easy way of working: each checkpoint that you are using has a number/color. When you are playing Droiko, the Droiko App will tell you what is each color at the start of the game, so you can place them accordingly before playing. For example in a short race the red checkpoint is the starting line, green checkpoint the second track reference and blue checkpoint the finish line. This way it is very intuitive to play games and start having fun since the first minute.

Subscribe to our newsletter using the bar below and we will keep you updated on new posts we are publishing. To help us spread the word about Droiko, share this post or follow us in Facebook, Twitter, Linkedin, or Google+ using the buttons at the end of the post.

A few more details about Droiko checkpoint

While being simple to understand and modify, each Droiko checkpoint is a very advanced piece of technology. Each Droiko checkpoint creates an invisible spherical radio-frequency field around itself. The size of this field is configurable from a few centimeters to a few meters. Droiko helicopters detect these fields and use them as references and targets. The image below represents this invisible field. Droiko checkpoints can also communicate to each other and to Droiko helicopters, in order to synchronize some gaming information. While doing all this they can also detect laser impacts using the same laser detectors mounted on Droiko helicopters.

A very interesting use is when they work as position and height references. This is something that is usually only seen on very expensive professional drones. Thanks to its barometer, each checkpoint serves as a pressure reference.checkpoints2-1.jpg?width=400 Using differential pressure height control, we can avoid height changes due to atmospheric pressure changes. Each Droiko helicopter also knows how far, approximately, they are from each checkpoint, so we can perform some autonomous flight or apply exclusion areas.

As a final note we would like to mention that the pictures shown here are not from the final checkpoints’ design. The final design features a Lego ® compatible plastic box, a removable suction cup in order to fix them to windows and flat surfaces, a high power full color led, laser detectors, an expansion port, a switch, a USB programming port… The final design will be made public in the following weeks.
 

Share to
Follow us
Read more…

3689709561?profile=original

At the end of 2015, our UAV research lab at the French Civil Aviation University took part to an atmospheric research project with Meteo-France (CNRS-GAME and ENM) teams at the Atmospheric Research Center of Lannemezan (in the south of France).

This project, named VOLTIGE,  aimed at studying the formation of cloud and fog events, with simultaneous measurements through multi-UAV flights. One of the planes is measuring the turbulence near the ground, a second plane is flying above the cloud or the fog with a radiation sensor and the last one is making a vertical profile of temperature, pressure and humidity up to 1500 meters AGL.

All the planes were controlled by Paparazzi UAV Apogee boards, with on-board logging on SD cards and navigation patterns triggered by sensors readings.

The video of the flights is finally on-line.

https://youtu.be/tLcYyohd_hE

Original posts are here: https://blog.paparazziuav.org/2015/12/04/multi-uav-flights-for-simultaneous-meteorological-measurements/ and here: https://blog.paparazziuav.org/2017/01/18/multi-uav-scientific-flights-video/

Read more…

Our research group (Ofer Eldad, Andrew Alexander, and Christian Claudel) at the University of Texas at Austin  has implemented a supervisory control algorithm we developed to protect the flight envelope with either human control or autopilot. 

Our test platform is the Bormatec Maja shown below:

3689710561?profile=original

The basic idea of the supervised control algorithm is to predict possible states at a future point in time given all possible allowable inputs and disturbances and then limit the control surfaces so that the UAV remains in a "safe state" regardless of human / autopilot input. This algorithm is based on our prior work published by the AIAA Journal of Guidance, Control, and Dynamics titled "Real-Time Computation of Safe Input Sequences for Unmanned Aerial Vehicles".

The "safe state" can be defined as keeping the angle of attack in a certain range, and/or limiting the max velocity, or any other function or combination of functions of the UAV's state that is considered desirable such as minimum altitude and/or maximum vertical acceleration and more.

The algorithm is implemented on an Odroid XU-4 that is connected to a Pixhawk. The Odroid receives sensor input in real time from the Pixhawk, and uses these measurements to get an estimate of the current state using an Unscented Kalman Filter (UKF) for the UAV's 12 states (position, velocity, orientation, rotation rates) in addition to angle of attack, sideslip, and airspeed.

Only IMU measurements are used (accelerometer, gyro, magnetometer) for this flight envelope protection system. The pitot tube and GPS don't need to be used (and are not used in this implementation). This sacrifices good knowledge of position, but we are not interested in good position data for these flight tests.

In order to get the angle of attack, angle of sideslip, and airspeed, we use machine learning based on IMU measurements along with control surface / throttle inputs.

The video below shows a sample pitch maneuver performed by human controller. In this maneuver, the safe elevator input sequence is characterized by an ellipse (projection of 8 dimensional ellipsoid onto 2-dimensional sub-space). Once the commanded elevator input (blue circle) deviates outside of the allowable region, the Odroid overrides the pilot input to the elevator (red triangle) to ensure the angle of attack doesn't exceed a maximum defined value (here 15 degrees).

This system is similar in spirit to alpha-protection systems implemented on Airbus aircraft.

Read more…

3689709403?profile=original

Great feature coming up soon in Ardupilot's Copter 3.5. And congrats to the contribution of the month winner!

...

Congratulations to Peter Barker for winning the "Best Contribution of the Month" for Dec 2016 for his Package Place Feature (video here).

This new mission command (which will be released with AC3.5) allows a vehicle to deliver a package autonomously without the vehicle actually touching down. It accomplishes this by carefully monitoring the motor level until it detects the package touching down. It then opens the gripper to release the cargo. This is very handy especially for delivering packages on surfaces (i.e. mountain sides or the sea!) where the vehicle cannot safely land. Read more, including videos,  here ...

Read more…

Evolution of our prototypes. PART 3

Link of our Droiko on Kickstarter: Kickstarter Droiko 

3689709344?profile=original

Checkpoints latest prototypes.

3689709400?profile=original 

White Droiko latest prototype. Explaining how to use any RC transmitter with Droiko.

3689709428?profile=original

White checkpoint latest prototype. Put on a tree as a racing track control point.

3689709467?profile=original

White Droiko latest prototype. Front view. That's the laser marker, not a camera.

3689709440?profile=original

Black Droiko latest prototype flying high outdoors.

Read more…


   Hi guyz, just wanted to share my latest work with you and conclude the Defiance fpv airframe development series.


3689709520?profile=original


Frankly it's been a bumpy road till here but I wouldn't change a bit. 


In 2012 I got interested with fpv and quadcopter designs so I started reading, learning and drawing few ideas, going on and off the project as I could find the time for it. By the end of 2014 first complete solution was introduced under the name of AtasDefiance 265 which was later followed by imitations known as Robocat, Tarot TL280 and few others which basically enabled many to try out this sort of design philosophy which is kinda cool really.


I wouldn't take this things much seriously tho, it's just one of many great designs out there anyway. After all, it's meant to be fun :)


 Anyhow, some time later I've come to the point I'm completely satisfied with the results and am very excited to present you the Defiance PRO airframe built for FPV which should be soon made available to fellow flyers. 


Hope you like it, will share more info soon :)


Special thanks to the ArmattanProductions for stellar production services that enabled me to finish my project at such high quality.


Best,

Daxo

-  Evolution, 2015 Meets 2017 -

3689709487?profile=original

Read more…

3689709362?profile=original

(https://www.kickstarter.com/projects/847478159/the-t200-thruster-make-100-limited-edition)

Hello everyone,

My name is Rusty and I'm from Blue Robotics. We first posted our thrusters on DIYDrones back in 2014 - we've come a long way since then making lots of components to make marine robotics easier and more accessible. Most recently we've been working on ArduSub, based on ArduCopter, which has turned into a fully-featured autopilot system for subsea vehicles. The work done by the DIYDrones and ArduPilot communities is incredible and we are grateful for it.

3689709319?profile=original

Limited Edition Clear T200 Thruster (left) and the standard T200 Thruster (right).

Today we're back on Kickstarter with a fun project for Kickstarter's "Make/100" Initiative: A completely clear version of our T200 Thruster! It will make your next (or first) underwater project unique and is a cool learning tool as well. The campaign is limited to just 100 backers.

3689709421?profile=original

BlueROV2 with T200 Thrusters in Spain. (Nido Robotics)

Along with the campaign, we're donating 50 thrusters to the MATE Center to be given to middle-school and high-school robotics teams in need of funding.

The campaign ends January 31st and we hope you'll consider backing us!

Thanks,

Rusty and the Blue Robotics Team

Kickstarter: https://www.kickstarter.com/projects/847478159/the-t200-thruster-make-100-limited-edition

Read more…