All Posts (11086)

Sort by
Wiki Ninja

maxresdefault.jpg?width=600

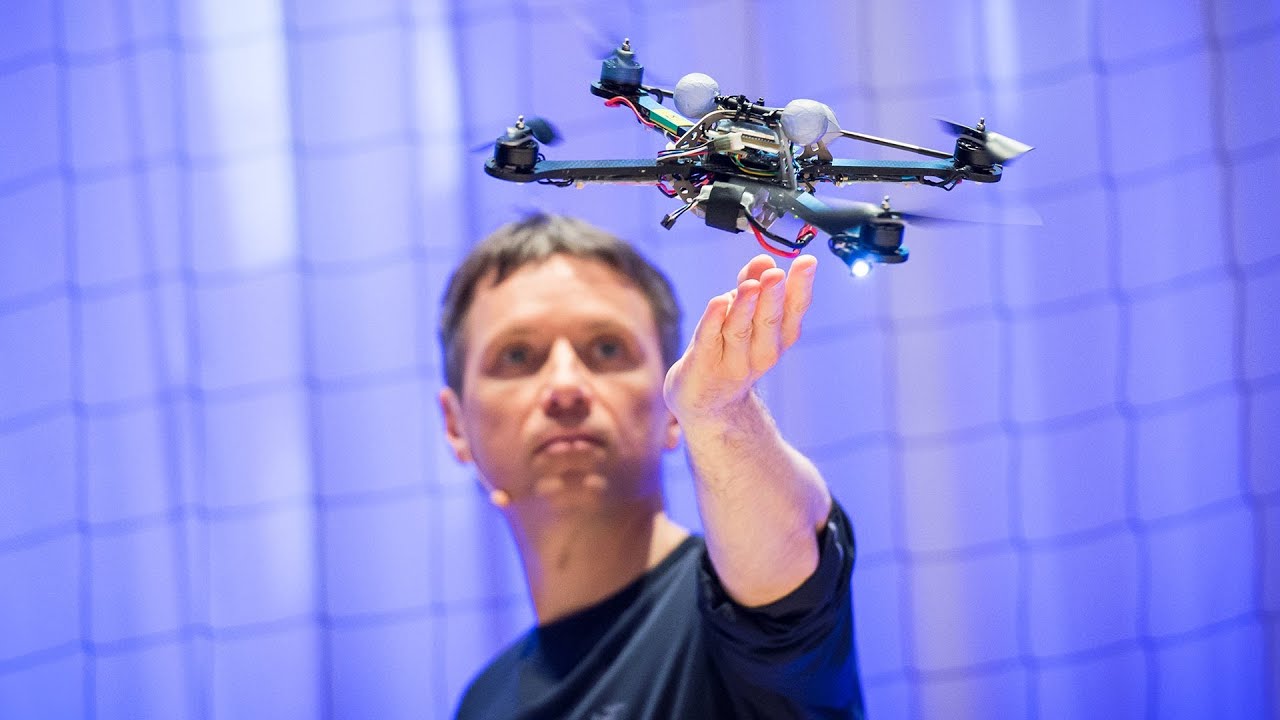
In a robot lab at TEDGlobal, Raffaello D'Andrea demos his flying "quadcopters".. robots that think like athletes, solving physical problems with algorithms that help them learn.

    In a series of nifty demos, D'Andrea show drones that play catch, balance and make decisions together -- and watch out for an I-want-this-now demo of Kinect-controlled quads.

  
  http://www.ted.com/talks/raffaello_d_andrea_the_astounding_athletic_power_of_quadcopters.html

Read more…

3689534910?profile=original

I never do a range check. But when I do, I forget to take it out of range check mode before takeoff.

APM2.5 saved the day and loitered around home until we realized our silly mistake. 

This was our first flight ever with APM. Everything worked nice. Special thanks to Droidplanner app, which talked  to us throughout the whole flight and kept calm when everyone else was panicking. 

Read more…

So it`s been just a bit more than a year and a half since we first offered the Aeromaper UAV platform and we have seen the Aeromapper evolve significantly.

3689534762?profile=original

Since we introduced the Aeromapper Option E it has been a great success because it is a complete package with excellent features on it, that we managed to keep at a reasonable price, like the following:  

- Camera: Sony NEX 7 (24 megapixel camera!) with Voigtlander 15mm wide angle lens. It is a top quality combination for mapping. The camera mount inside the UAV also allows for enough room to use other lenses, like a Pancake lens. Not as good as the Voigtlander, but much lighter in comparison.  In addition, we received a great amount of requests from customers wanting to use as well the Tetracam ADC Lite camera on the Aeromapper option E, so we ended up adding a very light camera mount for this camera too. The user just need to switch cameras between flights. 

3689534734?profile=original


3689534815?profile=original3689534749?profile=original- Parachute recovery: it's been really a winning feature, because literally no RC skills are required for landing. Just flip a switch and it lands nicely & safely. The parachute release bypass the autopilot, meaning that the human pilot is always in command of it. The user don't need to wait until the mission is over the deploy the chute, it can be released at any moment during flight, which is another great failsafe feature. Normally, the chute is deployed when the plane is loitering over the home location at about 50 m or so, after the return-to-launch flight mode has been selected or the mission finished.

- Automatic trigger: many people have asked us how the triggering "sequence" works. It is pretty straightforward: flip a switch on the remote control and the camera will start shooting images every 4 seconds by default (via an infrared shutter release) but easily adjustable to 1, 2, 3, ......60 seconds, or minutes. At the same time the camera lens cover door will open automatically.  Flip the switch again and the lens door will close and the sequence will pause until new command.

3689534823?profile=originalWe also have been asked to provide only the fiberglass Payload Bay Modules (also called pods) for developers & researchers, including some universities, so that they buy only this part and integrate it to their existing airframes adding more internal volume for payload, a parachute recovery system, and the lens cover door features. For this reason we decided to offer a package with this module only, at a very reasonable price. We found it can be easily attached to a huge range of airframes. It comes with the standard 60'' diameter High Drag coefficient parachute (highest drag is achieved with a toroidal shaped chute) and kevlar lines. But for users with larger or heavier airplanes up to a 72'' diameter parachute can be installed.

This is another great & unique advantage of the modularity of The Aeromapper.


The Aeromapper option C is also another variant often ordered by universities for project development and payload testing. The combination of Ready to Fly status with ArduPilot Mega and telemetry, Parachute system, DX8 transmitter and price makes it very attractive.

3689534856?profile=original

Read more…

3689534692?profile=original

"There won't be any Predators preying on the unsuspecting at

the Small Unmanned Systems Business Expo being held

in San Francisco on July 25-26, but rather a group

of entrepreneurs praying that they can bring enlightenment

to the masses by extolling the values of their small unmanned vehicles.


Sponsored by the sUAS News Group, the group is hoping to change the narrative

and broaden the perception of “drones”. They have gotten a bad rap and there

is a running misconception that they are going to be used to look in people’s windows,”

says Patrick Egan, President of the Silicon Valley chapter of the

Association of Unmanned Vehicle Systems, Int’l. “We see them being used in

search and rescue operations, wildlife management, forestry protection, waterway

and levy surveys , as well as feeding a hungry world,” he said.


 “The positive uses for this technology are endless.”


“California has had many firsts in aviation and we are continuing that tradition

as this business event will be the first of its kind, with speakers, exhibitors,

and an opportunity to pilot a drone,” said Egan. “This will be a great opportunity

for people to walk through the door of a new era in unmanned, robotic technology."

 Register here 

Speakers include:


Chris Anderson, 3D Robotics,        Chris Norris, CEO Alta Devices


Tad McGeer, CEO Aerovel               Chad Partridge, 2D3 Sensing        


Ken Giles,  PhD UC Davis                 Chuck Johnson, NASA


Dr. John Appleby, DHS                     Karl Hedrick, PhD  UC Berkeley


Patrick Egan, sUAS News               Joerg Lamprecht, AIBOTIX     


Gene Robinson “sUAS for SAR”    Douglas McQueen, LeClair Ryan Law


Eileen Shibley, Cal. UAS Portal       Ted Wierzbanowski “ASTM F-38 Update”


Gus Calderon, “IsisCopter”             Mathew Schroyor, “Drone Journalism”


Gary Mortimer, sUAS News             Dr Jerry Lemuix, UVU


Gretchen West, AUVSI
Read more…

Techpod Drone ready-to-fly to Belize!

img_1094.jpg

(Re-posted from: http://conservationdrones.org/2013/07/08/techpod-drone/)

Earlier this year, Wayne Garris from the Kickstarter project, HobbyUAV.com, donated two Techpods to ConservationDrones.org. I finally just had the time to build one up, equipped with an APM 2.5+ autopilot system.

This drone will be one of four that we will be bringing to Belize later this Summer. We are partnering with WCS to fly over Glover's reef to explore the use of drones for patrolling marine protected areas.

While building this drone, I was quite concerned about the wing flex, even though I was assured by others that these 2.5 m wings are meant to flex!

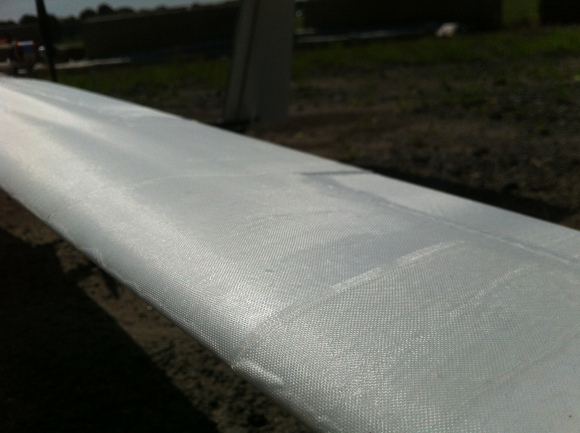
I decided to add some rigidity to the wings by fiber-glassing them with an ultra thin glass fiber cloth by applying several coats of water-based polyurethane. The fiber-glassed wings definitely helped to reduce wing flex and prevent sudden dips in the air. (I know I did not do a perfect job of it, but I am happy just as long as it flies!)

img_1118.jpg?w=580&width=750

img_1115.jpg?w=580&width=750

img_1116.jpg?w=580&width=750

After installing the APM 2.5+, receiver, telemetry and APM power module, there really wasn't much space left inside the fuselage.

img_1125.jpg?w=580&width=750

I created a battery holder using a piece of craft wood (pine), and a few pieces of velcro. This battery holder replaces the canopy, and can hold up to two 5000 mAh Turnigy batteries. The picture below also shows the location of the Turnigy Thrust 45 A ESC I used. I always prefer to place the ESC outside the fuselage to avoid overheating. The wings are held together mostly by friction at the wing joints, but further secured by several elastic bands hooked onto picture hangers on each wing. These picture hangers were glued to the wings with J-B Weld steel reinforced epoxy.

img_1112.jpg?w=800&h=597

At first, I wasn't quite sure whether to glue the nose dome to the fuselage. In the end, I decided to improvise a hinge using control horns so that I can access the APM and receiver from the nose if needed.

img_1119.jpg?w=800

The motor mount was given extra support from two 5 mm diameter wooden rods wrapped in shrink tubes, taped to the rear of the fuselage and zip-tied to the motor mount. I used a Turnigy 3536 1000 kv motor spinning a 11x7 2-bladed MasterAirscrew propeller. This combination provided about 1.6 kg of thrust, drawing about 30 A at 100% throttle. The All-Up-Weight (AUW) of this setup with one 5000 mAh battery is about 2.0 kg. This plane can cruise comfortably at 30-40% throttle drawing about 6-8 A. (I fly it with about 5 degrees flaps, which significantly improves lift without creating too much drag.)

img_1114.jpg?w=800

The rudder servo was moved from underneath the fuselage to nearer the tail section. I used 22 g Corona digital metal gear servos for the rudder and elevator, and 11 g Turnigy metal gear servos for ailerons and flaps.

img_1121.jpg?w=800

I don't like fussing with aileron and flap connectors inside the limited fuselage space, and so decided to bring them outside. This makes wing assembly and disassembly in the field much easier. In this picture you can also see the antenna for the 3DR telemetry.

img_1129.jpg?w=800

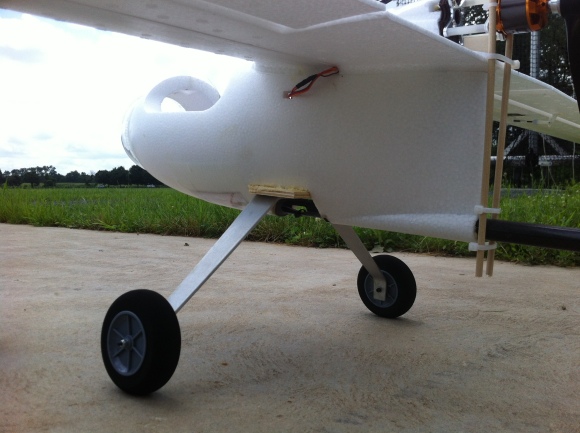
I installed front landing gear to a piece of plywood Gorilla-glued to the bottom of the fuselage (where the carbon fiber rod is exposed).

img_1103.jpg?w=580&width=750

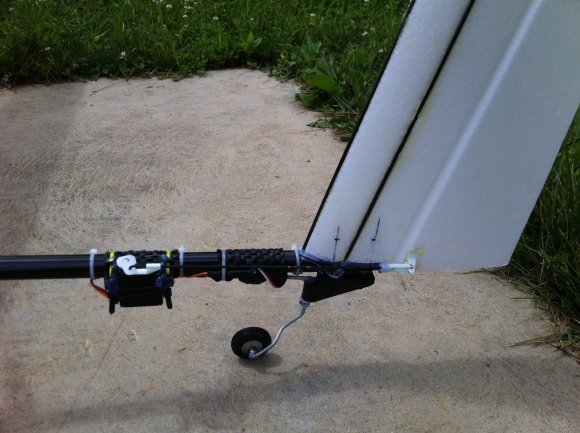
The rear landing gear was screwed to the bottom of the tail section. These two screws also attach the vertical stabilizer to the carbon fiber rod.

img_1101.jpg?w=580&width=750

The horizontal stabilizer is attached to the vertical stabilizer by an improvised system of control horns and 1.5 mm carbon fiber rod. These mods make the Techpod completely modular and can be easily disassembled and packed back into its shipping box.

img_1104.jpg?w=580&width=750

I improvised a camera mount by just attaching a 15 mm diameter carbon fiber rod to the main carbon fiber rod using a few pieces of zip-ties (cable ties). This system also allows me to adjust weight distribution to achieve optimal CG (85-90 mm from leading edge of wings).

img_1132.jpg?w=580&width=750

img_1133.jpg?w=580&width=750

img_1136.jpg?w=580&width=750

img_1134.jpg?w=580&width=750

During the maiden flight, I tested flight endurance by letting it fly in Return-To-Launch (RTL) mode. It did so mostly at a speed of 10-12 m/s at 30-40% throttle. At 50% battery capacity (of a single 5000 mAh battery) it had stayed in the air for about 18 minutes. So I estimate a flight time of 30 minutes (range of 21 km) with one battery and 50 minutes (36 km) with two batteries.


... Sneak Peek of the next Conservation Drone, based on the amphibious Icon A5!

img_1138.jpg?w=800

Read more…

3689533873?profile=original

Announcing our new product listings for mid-summer 2013!

 _______________________________________________________________________________________

3D Robotics Y6 and X8 Multicopters - RTF and Kit

We released the Hexa-to-Y6 conversion kit a few weeks back, and now the complete Y6 DIY package and Ready-To-Fly  are available. A Y6 design is able to withstand a single motor out scenario, provides a more open and stable view for cameras, and doesn't weigh as much as a traditional Hex (because it uses less parts). It features folding arms to make ground transport a painless affair. This is our new go-to multicopter at 3DR: better performance than a quad at about the same size!

 3689533965?profile=original

If six motors aren't enough for you, there is now the X8. With the same coaxial motor design as the Y6, but with four arms. This brute is amazingly compact, it's actually smaller than our quads in the front to back dimension, due to the wide angle of the arms. This is the platform to choose for flying your heavy camera and gimbal setups. The redundant nature of this vehicle is a valuable trait when carrying expensive gear or flying over difficult terrain. This vehicle can lose a motor and remain in a stable loiter with almost no disruption .  The 3DR X8 is available ready-to-fly only at this time.

3689533943?profile=original


APM 2.6 and 3DR uBlox GPS with Compass

3689534018?profile=original

APM 2.6 is the same APM 2.5 you know and love, but with one valuable change: this revision of the board has no onboard compass, which is designed for vehicles (especially multicopters and rovers) where the compass should be placed as far from power and motor sources as possible to avoid magnetic interference. (On fixed wing aircraft it's often easier to mount APM far enough away from the motors and ESCs to avoid magnetic interference, so this is not as critical, but APM 2.6 gives more flexibility in that positioning and is a good choice for them, too). This is designed to be used with the new 3DR uBlox GPS with Compass, so that the GPS/Compass unit can be mounted further from noise sources than APM itself.

Note: APM 2.6 requires an external compass for full autonomy. If you are using APM 2.6 with a GPS module that does not have a compass sensor, you must use a stand-alone external compass. We recommend this one with this cable.

3689533900?profile=original

New GPS shown as it comes, in a nice enclosure
3689534039?profile=original

The board, inside the enclosure

You can also use the new uBlox GPS with on board magnetometer (compass) with your existing APM 2.5, To modify your board, follow the directions here.

_____________________________________________________________________________________________

FPV Package

If you have been wanting to add first-person-view (FPV) capability to your vehicle, our new FPV package gives you everything you need in one kit (including batteries). All connectors have been built in the factory and designed to give you an easy plug-and-play experience -- no soldering required! On-screen-display is provided by our MinimOSD board for real time data telemetry. This is an important safety and convenience feature for anyone flying FPV.

3689534110?profile=original

__________________________________________________________

All of these items are available for order immediately.

The FPV kit is ready for shipping today.

The Y6 DIY package and APM 2.6 will ship on July 15th.

Note: RTF Y6 and X8 units will follow the normal 1-2 week turnaround. You'll find those and more on our new RTF store here: http://rtf.3drobotics.com/


Read more…


I have been working recently with the Robotics Association at Embry-Riddle Aeronautical University to provide the multi-rotor component of their 2013 Roboboat competition.

3689534710?profile=original

You can see some footage of the flight and collision testing above.
 As the competition approached it became apparent the need for prop guards. Here are the two versions I came up with. The first was four Kydex rings with spokes that attached to the motor mounts

  The second approach removed much of the excess material and reinforced the structure with 1/8" srung carbon fiber spars to increase rigidity and keep the weight low. There was a 10% drop in flight time and the throttle response seems relatively normal. ounts. I flexed the rings into an arc to provide rigidity yet maintain a perimeter around the prop. Worked well in minor collision testing, although the impact on flight characteristics and longevity where severely diminished. 

  I have seen a lot of approaches out there and would be interested in the feedback on these designs and what should be considered with regard to maintaining prop efficiency,reducing weight while providing suitable protection.

Read more…

3689534575?profile=original

3689534482?profile=original

Hi guys,

As way of contributing to the development of AC, I have decided to try and document possible solutions to the compassmot problems I have, and their effects on compassmot.

In summary - I have a compassmot score of 148% (without modifications), and it toilet bowled. For those unfamiliar with this expression, it is when loiter is engaged, the MR starts to circle in an ever increasing circle (while maintaining the same heading) until a loss of control event. This is caused by magnetic interference on the compass. I won't cover this in too much detail, as there are threads dedicated to this.

The most effective method is to move the APM away from the source of the interference - most likely the PDB and ESC's directly below it. However, there are reasons why this is not a practical solution.

For me, my reasons are:
1. Safety features.
I want to keep my protective hardware to protect the electronics in the event of a flip. This is a clear dome, and a FG cage underneath (you can see the cage in the pic above). If I raise the APM board, I will need to raise these too. The cage I could probably do with 6-7cm risers but I've not found any. I can get them in metal, but that will cause more mag problems! But the dome needs to stay where it is, forming an effective seal when velcro'ed down to the top plate. It's very effective at dust and grass exclusion, and I don't want to lose that.

2. Cost.
To raise the APM board 2cm I need to purchase the following (admittedly not expensive) parts:
- 8 new male-male servo cables, 5cm longer than the current ones
- 4 x 3cm rubber risers, or 4 x conventional plastic ones. Obviously I want to preserve my vibe damping so I want those…but they're like hens teeth

- 4 x servo extension for the motor servo leads
- a 5cm longer DF13 for the telemetry
- a 5cm longer DF13 for the power module feed
- a 5cm longer DF13 for the GPS
- 4 x 6cm risers for the cage (assuming I want to sacrifice the protective qualities of the dome)
- 8 x plastic screws to replace the metal ones close to the APM
- I already have the mumetal and ferrous rings but they're still a cost

So what to do?

There are 3 alternative options to airframe modification. Two of which I will try and detail here - I have already covered the effects of the first one (addition of mumetal and ferrous rings here: http://www.diydrones.com/profiles/blogs/how-i-got-from-148-to-43-on-compassmot). I will try to document via pictures, video and log data their respective performance improvements, and where I got the components from.

Option one - addition of 3rd party external mag to existing APM 2.5+

For this I have purchased:

a) the external compass: http://www.goodluckbuy.com/hmc5883l-triple-axis-compass-magnetometer-sensor-module-for-arduino-mwc-m49.html

b) a DJI-style riser: http://www.goodluckbuy.com/bracket-holder-set-for-dji-wkm-gps-autopilot-system.html

c) a 30cm or 45cm DF13 4 wire. Except...I can't find any! Only place is 3DR...and they want to charge me $38 for shipping *one* cable! If anyone can help with the sensible purchase or construction of this cable, I'd be most grateful, and would happily cover your costs.


Option two - addition of new 3DR external GPS/compass to 2.5+.

In all cases, the "baseline" airframe will be the one that flew perfectly on 2.9.1. ie:

quadframe heavy: (http://quadframe.com/collections/quadcopter-frames/products/heavy-weight-quadcopter-frame-with-21-5mm-carbon-arms). The one useful feature is the external DJI pylons...perfect for mounting external, mag sensitive stuff away from the main components.

quadframe 155mm legs
quadframe DJI board (for mounting APM on)
quadframe PDB
Tmotor 3508-29's 380kv
Tmotor (clones) 1455 CF props
Tmotor 30A OPTO PRO ESC's
Spektrum Rx + telem
APM 2.5+, incl ublox GPS, power module, 433 telem

Flight pack is either a 10900 6S or 2 x 4000 6S. Electronic pack attached to 3DR power module is 890 3S.

UAW: 3.8kg

Stay tuned - I'll post the first results in this thread when the parts arrive in a few days time.

Read more…
Moderator

We flew an Arducopter (a.k.a Japicopter Sr.) along Bambarakanda Falls, the tallest waterfall in Sri Lanka (863 ft - 299th in the world) to capture a video footage. The copter flew flawlessly despite occational strong winds.

We used firmware V2.9.1b on APM 2.0 board. The location didn't help us for a GPS fix, hence mostly relied on Stabilize mode, and occasionally used altitude hold mode. 

We missed a good camera gimbal to do hardware stabilization. Some modifications are already planned to get rid of jello. We had to use software stabilization in the video. 

This is our first video and appreciate suggestions a lot!

Read more…

What does toilet bowling look like?

3689534468?profile=originalAs you can see, this is the beginning of a toilet bowl, which - left unchecked - will crash.

Took my quad out tonight, after going back to 2.9.1. First few loiters, everything was ok. Even did a few RTL's. Everything looked like before.

Until the last two loiters - my toilet bowl was back! At first, I thought it was because I had tried to tighten loiter a little (P from 0.2 to 0.4). Fair enough I thought. But I set it back to 0.2, and the toilet bowl was still there!

Now admittedly, I still have all my 3.0.x mods on - mumetal, ferrous rings etc, but I didn't think loiter used these in 2.9.1. Some investigations required here. Well, they're all coming off tonight, and I'll be back out tomorrow with the airframe absolutely identical to pre 3.0.x. And my logs set to raw + motors, as tonights were still set at factory default so missing some important data2013-07-07%2020-47%2011.log. Doh.

Unrelated annoyance: Had two props take up lawn mowing on take off tonight; one leg had snagged in a weed! So important tip; if flying from grass, make sure your legs are unsnagged. Another fun evening with the spirit level re levelling my arms as as consequence.

Read more…
Moderator

3689534443?profile=original

3689534539?profile=original


This is the first picture of VR BRAIN 4.5 + VR IMU GOLD.

Thi new imu expand the number of imu available for VRBrain .

With this addon is possible to have two active imu controlled by VR Brain.

On VR IMU Gold there are 3ACC 3GYRO 3 MAGN and a EEPROM for store temperature drift correction table.

With this kind of option we intend to improve a lot the quality of VRBrain for GOLD (Prosumer version ) and VRBrain PRO.

Now we are in development stages :) This is a good hack for your VR Brain 4.5 ;) 

The main advantages for Arducopter32 rev 3.1rc3 is that with external IMU is more simple to have less problem with vibration , and is possible to put the magnetometer far to electromagnetic fields.

This two option is very important so is possible to have a affordable and very high quality sensor data for your high speed cpu.

Is yet available in the code repository a branch that support external imu for your VRBrain 4.5

this is the link : https://code.google.com/p/vrbrain/source/browse/?name=ap_hal_ext_IMU

The imu is connected to SPI3 of VRBrain , but the onboard imu still available on other SPI1 so is possible to implement a code to read the two imu at same time to have more affordable data for your ahrs algorithm.

Best

Roberto 


original url : http://www.virtualrobotix.com/group/armcopterdevgroup/forum/topics/vr-brain-4-5-vr-imu-gold-is-coming?xg_source=activity


Read more…

DroneCafe.com In Beta/Testing Phase

Hey Folks,

I'm currently working on DroneCafe.com to provide people with a place to hangout and talk about drone politics/politicians, drone/robotics news, and also a place to openly talk about militarized drones.  This website is more for entertainment and not tech based or open source based like DIY Drones allowing for you to discuss things on DroneCafe.com that have no place/business being posted or discussed on DIYDrones.com!  

Feel free to make an account on DroneCafe.com and mess around with blogs/photos/forums/etc!  It will help me get an idea on how I should finish setting up the website.  Also you can check out Ning 3.0 which is what DIY Drones will be migrating to very soon.  Ning 3.0 also allows for very easy posting of Vimeo videos so you can test that out if you are an avid Vimeo uploader

Take it easy DIYDrones.com, 

Joshua Johnson (DIY Drones News)

Read more…
Moderator

Quadcopter in the Kalahari, Part 2

Eventually I got around to part 2, part one is here recorded with a laptop from a TV card.

Part 2 was recorded on-board the quad with a 808 #16 v2 keychain cam, the flying was done FPV with video glasses and a 1.2 GHz BOB Fox 700mW video Tx & Rx. Quad is my own design EPP folding H-frame quad. Editing the vid down to size wasn't not easy as I took about 120mins of video but any way here is the result (but watch out for part 3).

Please excuse the bit of Jello on the video at times but this #16 cam is very sensitive to any vibs.


Read more…

How I got from 148% to 43% on compassmot

Ok, so I've not been that impressed with the whole compassmot thing, given it ruined a perfectly good quad. I did the whole compassmot thing, and eventually got 148%. It flew and loiters ok (eventually) but one pack to the next the toilet bowl kept coming back, and I had yaw issues and loiter took ages to stabilise.

So, I admitted defeat, and vowed to resort back to 2.9.1.

Or I did, if I wasn't so stubborn. Never one to admit defeat gracefully, I decided to give the compassmot one last chance, after a few mods.

Here are my mods to my quad (QUAD heavy from www.quadframe.com)...

My setup:

3689534338?profile=original

1. Mumetal on the underside of the APM board, in a single 8x8cm sheet. This overhangs the board slightly, but that's intentional - I wanted some screw tops covered by it.3689534433?profile=original

2. Ferrite rings on the 4 servo leads from the ESC's, wrapped twice each.

3689534502?profile=original

3. Errr....that's it. And I refuse to do more! I want to fly, not be constantly tweaking!

Result? With no other mods, Compassmot has dropped from 148% to 43%, and I did the compassmot to 100%, not the 50% suggested in the instructions. Once I've got the kids down later tonight, I'll re-run live compass calibration then have a test flight. Hopefully it will be the last damned time I have to do this, and I can actually get back to flying...

If this still fails...well, I'm going back to 2.9.1

Read more…
Moderator

My new favorite multirotor video

Spx_Grasshopper_03.jpg?width=300

I love this video clip, hands down the best I have seen to date from a multirotor. Can you guess I am a little bored of endless reveals and pans ;-) No bits of an airframe in shot, no GoPro distortion and filming exactly what they want it to. Brilliant! Watch in HD !

The images tell the story and yes we are told its from a hexacopter but that does not really matter a story is conveyed.

Read more…

29067.jpgHobby King has come out with 2 new multicopter motors in the 9014(!) size. One is 105kV, the other 135kV. With 385g, they are surely on the heavy side, but they are designed for 6S with a max current of 40A. According to the description, they were made for 26" props.

Surely nothing for your everyday sport quad, but now there's finally motors available which would allow building really big quads (MD4-1000 class and bigger) with reasonable air times.

105kV: http://www.hobbyking.com/hobbyking/store/__29067__Turnigy_9014_105kv_Brushless_Multi_Rotor_Motor.html
135kV: http://www.hobbyking.com/hobbyking/store/__28105__Turnigy_9014_135kv_Brushless_Multi_Rotor_Motor.html

Read more…
Distributor

Night Flyer

Second test (much better image quality!)

https://www.youtube.com/watch?v=nmOXCuAHAe4

My first night test.


Hexacopter: 810mm wheelbase

APM 2.5

Firmware AC3.0

Running a full auto mission witn 5 WPs and RTL /autolanding

Soon I will upload more pictures and the flight log. Very impressive the xtrack correction

More technical details just ask me ;-)

http://www.diydrones.com/video/night-flyer

3689534403?profile=original

3689534315?profile=original

2013-07-04%2018-34-07.tlog

The flight starts at 51%

Read more…
Moderator


B.O.D is a VR Copter with this configuration :

  • VR Brain 4.5 with Arducopter 32 rev 3.1rc3 on board
  • 1 3DR Ublox GPS
  • Use 4 VR ESC prototype 30A with MultiWii ESC .
  • 4 T-Motors
  • 12 APC Inch Propeller.
  • 1 Lipo 5.800 Zippy compact.
  • 1 3DR Telemetry Module.
  • GoPro Hero 3 Black on board


With this configuration i doin 3 hours of fly test , normally the drone fly for 20 minutes with this configuration this is a good result for us.

With Arducopter32 rev v3.1rc3 our drone fly very well i testing all functionality :

Stable mode.

Loiter - Atti GPS mode with ovverride of position.

Return to landing point work fine .

Waypoint navigation work fine , too 

I found only a problem on hard stop when reach waypoint and RTL , some suggestion about the reconfigure parameters for have smooth stop instead of hard ?

Do you like our first RTF drone ? 

original blog post : http://www.virtualrobotix.com/profiles/blogs/vr-copter-x4-b-o-d-some-video-preview-from-the-first-3-hours-of-f

Best

Roberto Navoni


Read more…